Cozy No Bake Cherry Cheesecake Recipe
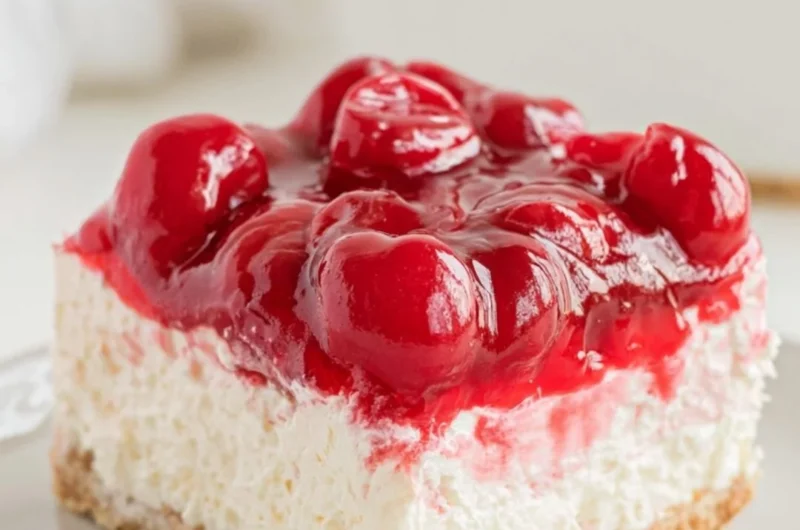
There’s something incredibly comforting about a luscious cheesecake nestled between a buttery crust and adorned with vibrant, red cherries. It takes me back to warm summer evenings spent gathered around the dining table with my family, sharing stories and sweet treats. The rich, creamy texture and the zesty burst of cherry flavor feel like a warm hug in dessert form.
As seasons change and warmer days approach, I find myself craving simple yet indulgent desserts. This No Bake Cherry Cheesecake is the perfect solution — it’s quick, delightful, and requires no baking, making it an ideal choice for those easy weeknight dinners or weekend family gatherings. Trust me, this is one you’ll definitely want to pin for later!
Why You’ll Love This Recipe
Effortless Prep: This no-bake dessert is super easy to whip up — perfect for those who want to impress without the fuss!
A Crowd-Pleaser: There’s no denying that cheesecake is a favorite among many, and this version is no exception. It’s a delicious hit at parties or family gatherings.
Light and Creamy: The creamy, dreamy filling pairs beautifully with the crisp crust, making each bite a pleasure to savor.
Customizable: Feel free to switch up the cherry topping for other fruity delights or even chocolate for a twist. Your tastes, your way!
Perfect for Any Occasion: Whether it’s a summer picnic or a cozy Holiday celebration, this cheesecake suits every season and reason.
Ingredients You’ll Need for No Bake Cherry Cheesecake
- 1 ½ cups graham cracker crumbs
- ⅓ cup unsalted butter, melted
- 2 cups cream cheese, softened
- 1 cup powdered sugar
- 1 teaspoon vanilla extract
- 1 cup heavy whipping cream
- 1 can (21 oz) cherry pie filling (or fresh cherries)
- Fresh cherries (for garnish, optional)
How to Make No Bake Cherry Cheesecake
Let’s make it together! Follow these easy and delicious steps to create your own No Bake Cherry Cheesecake:
Make the Crust: In a medium bowl, combine the graham cracker crumbs and melted butter. Mix until the crumbs are evenly coated. Press the mixture firmly into the bottom of a 9-inch springform pan to form a solid crust.
Prepare the Cream Cheese Mixture: In a large mixing bowl, beat the softened cream cheese with a hand mixer until smooth. Gradually add the powdered sugar and vanilla extract, mixing until well combined and creamy.
Whip the Cream: In a separate bowl, whip the heavy cream on high speed until soft peaks form. This should take about 2-3 minutes.
Fold Together: Gently fold the whipped cream into the cream cheese mixture. Be careful not to deflate the whipped cream too much — you want that airy texture to shine through!
Assemble the Cheesecake: Pour the cream cheese mixture over the graham cracker crust, spreading it evenly. Smooth the top with a spatula for a beautiful finish.
Chill: Cover the cheesecake with plastic wrap and refrigerate for at least 4 hours or overnight. This will help the flavors meld beautifully and give it time to firm up.
Top with Cherries: Once set, spread the cherry pie filling over the top of the cheesecake. For an extra touch, garnish with fresh cherries if desired.
Slice and Serve: Gently run a knife around the edges of the springform pan before releasing it. Slice the cheesecake into wedges, serve, and watch it disappear!
Fun Ways to Customize It
Berry Blast: Substitute the cherry topping with a mix of fresh berries for a bright, zesty twist. Think strawberries, blueberries, and raspberries for a summer delight!
Chocolate Lover’s Dream: Drizzle melted chocolate over the top and mix in some cocoa powder into the cream cheese mixture for a rich chocolate cheesecake.
Nutty Flavor: Add a handful of chopped nuts like walnuts or pecans into the crust for a delightful crunch and an indulgent flavor.
Minty Freshness: Stir in a teaspoon of mint extract into the cream cheese mixture for a refreshing mint chocolate cheesecake.
Chef Emma’s Helpful Tips
Make It Ahead: This cheesecake can be prepared a day in advance, making it a great option for stress-free entertaining.
Use Low-Fat Cream Cheese: If you want to lighten it up a bit, you can substitute with low-fat cream cheese. The texture and taste will still be delicious!
For Perfect Slices: Dip your knife in hot water before slicing to get clean, even pieces.
Store Leftovers: Keep any leftovers covered in the refrigerator for up to 5 days, although I doubt it will last that long!
Nutrition Information per Serving
- Serving Size: 1 slice
- Calories: 320
- Carbohydrates: 30g
- Sugar: 20g
- Fat: 22g
- Protein: 4g
- Sodium: 200mg
Frequently Asked Questions
Can I make this ahead?
Absolutely! It’s perfect for making a day in advance and letting it chill overnight.
Can I use different ingredients?
Yes! Get creative with toppings; fresh fruits, chocolate, or caramel sauce work wonderfully.
How do I store leftovers?
Keep leftovers covered in the refrigerator for up to 5 days. Just be prepared to share!
How long does it last?
The cheesecake will be best enjoyed within 5 days but should remain fresh if stored properly.
A Cozy Closing Note
This No Bake Cherry Cheesecake is a heartfelt dessert that’s not just easy to make, but also filled with nostalgic joy. Whether it graces your Holiday table or becomes the highlight of your summer picnics, it’s a sweet reminder of the comforts of home and the warmth of family gatherings.
Save this No Bake Cherry Cheesecake to your dessert board so it’s ready when you need a cozy treat!
Cozy No Bake Cherry Cheesecake
- Total Time: 240 minutes
- Yield: 8 servings 1x
- Diet: Vegetarian
Description
A delightful no-bake cherry cheesecake with a creamy filling and buttery crust, perfect for any occasion.
Ingredients
- 1 ½ cups graham cracker crumbs
- ⅓ cup unsalted butter, melted
- 2 cups cream cheese, softened
- 1 cup powdered sugar
- 1 teaspoon vanilla extract
- 1 cup heavy whipping cream
- 1 can (21 oz) cherry pie filling (or fresh cherries)
- Fresh cherries (for garnish, optional)
Instructions
- Make the Crust: In a medium bowl, combine the graham cracker crumbs and melted butter. Mix until the crumbs are evenly coated. Press the mixture firmly into the bottom of a 9-inch springform pan to form a solid crust.
- Prepare the Cream Cheese Mixture: In a large mixing bowl, beat the softened cream cheese with a hand mixer until smooth. Gradually add the powdered sugar and vanilla extract, mixing until well combined and creamy.
- Whip the Cream: In a separate bowl, whip the heavy cream on high speed until soft peaks form. This should take about 2-3 minutes.
- Fold Together: Gently fold the whipped cream into the cream cheese mixture. Be careful not to deflate the whipped cream too much — you want that airy texture to shine through!
- Assemble the Cheesecake: Pour the cream cheese mixture over the graham cracker crust, spreading it evenly. Smooth the top with a spatula for a beautiful finish.
- Chill: Cover the cheesecake with plastic wrap and refrigerate for at least 240 minutes or overnight. This will help the flavors meld beautifully and give it time to firm up.
- Top with Cherries: Once set, spread the cherry pie filling over the top of the cheesecake. For an extra touch, garnish with fresh cherries if desired.
- Slice and Serve: Gently run a knife around the edges of the springform pan before releasing it. Slice the cheesecake into wedges, serve, and watch it disappear!
Notes
This cheesecake can be prepared a day in advance, and leftovers can be kept in the refrigerator for up to 5 days.
- Prep Time: 15 minutes
- Cook Time: 0 minutes
- Category: Dessert
- Method: No-Bake
- Cuisine: American
Nutrition
- Serving Size: 1 slice
- Calories: 320
- Sugar: 20g
- Sodium: 200mg
- Fat: 22g
- Saturated Fat: 13g
- Unsaturated Fat: 6g
- Trans Fat: 0g
- Carbohydrates: 30g
- Fiber: 1g
- Protein: 4g
- Cholesterol: 70mg